Wednesday, November 24, 2010

Part 1- CONE

You will need;

K or L hook for 2 strand trees (my white one) I used an L hook.
5 oz of each color should do it, but have more on hand just in case.

Any size hook for single strand.
I used an I hook.

You need about half a skein for a tree. My skeins are 7 oz.


***While making the cone, join all rounds with a slip stitch in top of beg ch3.***

*** For each round, follow from * to * to finish each round.***

CONE

1. Using a magic ring make the circle, ch 3, 5 dc in ring. Join with sl st in top of ch3. Pull to tighten ring. (6dc)

2. ch3, dc in same st, *1dc in next st, 2 dc in next st* , around.

3. ch3, dc in same st, dc in each of next 2 sts, *2dc in next st, dc in each of next 2 sts* around.

4. ch3, dc in same st, dc in next 3 sts, * 2dc in next st, dc in next 3 sts*, around.

5. dc in each st around.

6. ch3, dc in same st, dc in next 4 sts, * 2dc in next st, dc in next 4 sts* around.

7. ch3, dc in same st, dc in next 5 sts, * 2dc in next st, dc in next 5 sts* around.

8. ch3, dc in same st, dc in next 6 sts, * 2dc in next st, dc in next 6 sts* around.

9. ch3, dc in same st, dc in next 7 sts, * 2dc in next st, dc in next 7 sts* around.

10. ch3, dc in same st, dc in next 8 sts, * 2dc in next st, dc in next 8 sts* around.

11. dc in each st around.

12. ch3, dc in same st, dc in next 9 sts, * 2dc in next st, dc in next 9 sts* around.

13. ch3, dc in same st, dc in next 10 sts, * 2dc in next st, dc in next 10 sts* around.

14. ch3, dc in same st, dc in next 11 sts, * 2dc in next st, dc in next 11 sts* around.

15. ch3, dc in same st, dc in next 12 sts, * 2dc in next st, dc in next 12 sts* around.

16. dc in each st around.

DO NOT FINISH OFF, you will keep going with the branches now.


Cone picture

This is what your cone part should look like layed flat.

Part 2- Branches

Branches

While still joined where you slip stitched last row of the cone part, you are going to slip stitch into the post(dc) from the last round (turning your cone sideways) and then slip stitch again into the post(dc) from the previous round. You actually totally skip the whole last row. You will be making the branches between the rows where my needles is in the pic below.
PICTURE 1

OK now, this is probably the hardest part, trying to explain where to put these branches! But once you get the hang of the pattern, you can go with easily, and should be able to make the next tree with no pattern! :)

Holding your cone upside down (wide part up)

1st branch! You will be doing treble(tr) stitches for a few rows, so wrap yarn around hook 2 times, then push your needle where mine is in the picture above, between the last 2 rows on the cone. Continue your tr st, ch1, tr, ch1, tr, ch1, tr, ch3, tr, ch1, tr, ch1, tr, ch1, tr, ch1. Now, looking back into where you just made this branch, count over 4 posts(dc) and sc into the same area between the rows (as in picture 1). Ch1. Counting over 4 more posts, your going to make another branch. Each branch will be this;
tr, ch1
tr, ch1
tr, ch1
tr, ch3
tr, ch1
tr, ch1
tr, ch1
tr, ch1
And your branch will look like the one in Picture 2 below.

Counting over 4 posts, sc, ch1. count over 4 more posts, make another branch. Keep going around like this until you are back to the first branch, then you simply step up a level, since you are working in a spiral to the top (from the bottom up!)


PICTURE 2

First Couple Rows

After spiraling around for 4 rows of branches, your tree should look like this one. Or, if you have a silly little boy like mine, you have just made a most interesting hat for him!
Hmmm, this last pic didn't come out very good.
Now after 4 rows of treble branches, you're ready to do dc branches.
So now each branch will get a little smaller, and the rows will go quicker too!
Each branch now will go like this;
dc, ch1,
dc, ch1,
dc, ch1,
dc, ch2 (ch3 for more pointy branches if you like)
dc, ch1
dc, ch1
dc, ch1

And you will now only skip 3 posts between branches. Try to make sure your branches are not lining up over each row, you don't want them in perfect rows over each other. You can adjust how many posts you skip between branches to get the next branch where you want it. This pattern is very flexible in this way.

You want 3 spiraled rows of dc branches.


Getting near the middle!

Hopefully your tree is looking somewhat like this silly boy's hat!So you now have 4 rows treble branches
3 rows dc branches.
Ok, now we're going to make those branches even smaller!
Each branch will now go like this;
dc, ch1
dc, ch1
dc, ch2
dc, ch1
dc, ch1
dc, ch1

And you can skip 2-3 posts between branches, depending on how you like the branches looking. I skipped around some to get my branches lined up where I wanted them. You can't mess up this pattern, so don't worry about not skipping the same amount of posts between branches!

Do 2 spiraling rows like this,
and then we make the branches even smaller.
Next 2 rounds will go like this;
dc, ch1
dc, ch1
dc, ch2
dc, ch1
dc, ch1

Now you can do a row or two of;
dc, ch1
dc, ch1
dc, ch1
dc, ch1

and while getting near the top now, you will want to start doing hdc's.
hdc, ch1
hdc, ch2
hdc, ch1
and skip only 1-2 posts between branches now.


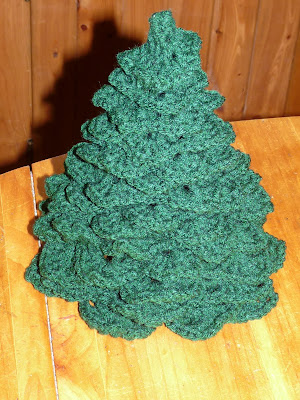
Finished Tree

This inside of the tree you can stuff with poly-fill if you like, or just crochet a circle bottom for it, or it's fine as is even.Here's my finished tree.....
and that silly boy again :):):)

Ornaments, Lights and Stars!

I bought these last year for the first tree I made. They were from Joann's but any craft store will have them.The stars you can put the stick part right thru the tiny hole on top the tree!
Those little presents are so cute!
I used a rainbow variegated yarn to make a garland looking somewhat like lights. Looks good on the darker tree.
This one I made last year. The branches are a little smooshed from being stored.
That silly little boy again! :)
Here is the light green one from last year, the dark green one I just made, and the white one which is 2 strands, so it's a little bigger.